Friday
Jul132012

Keeping your drains clean

I love the house we are renting right now. Though being built in 1911 there are some things I wish I could change. Like the fact that there is no insulation and it was 48 degrees this winter inside or the very small old pipes that are in parts of the house.

There is nothing worse than showering in a shower with a slow drain - water destined for the drain held up around your ankles. It is terribly frustrating to me. I had this happen lately and knew I needed to fix the situation but forgot every day until I got back in the shower. I finally made myself a note and remembered to take care of it. 

My new year's resolution was to finish removing all the products in our home that are made by people who test on animals. This has been a big undertaking over the past couple of years. One of the things I started with was removing products with dangerous ingredients. This meant a lot of baking soda, lemon and vinegar in our house which I think is awesome.

When talking about drains most people would reach for their handy dandy Drano. For slow drains that need a good clean out I have a natural remedy.

You will need - 

1 cup baking soda

1 liter of white vinegar

1 kettle or stock pot of water just off boil

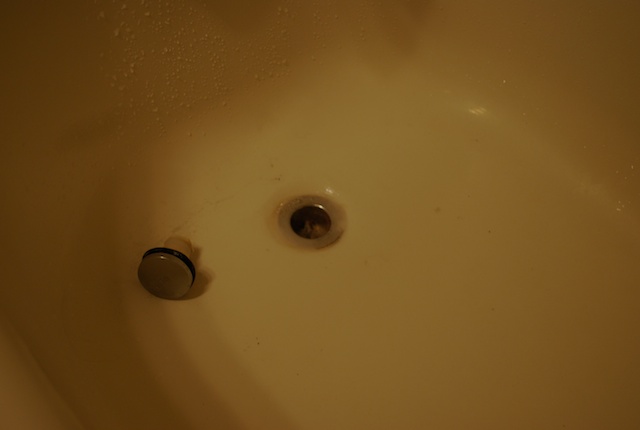
Take the plug out of the drain if needed and spoon into the drain the baking soda. Slowly trickle the vinegar down a little at a time. The combination will bubble and foam then slide into the drain. Finish pouring the vinegar down and let soak for 20 minutes. 

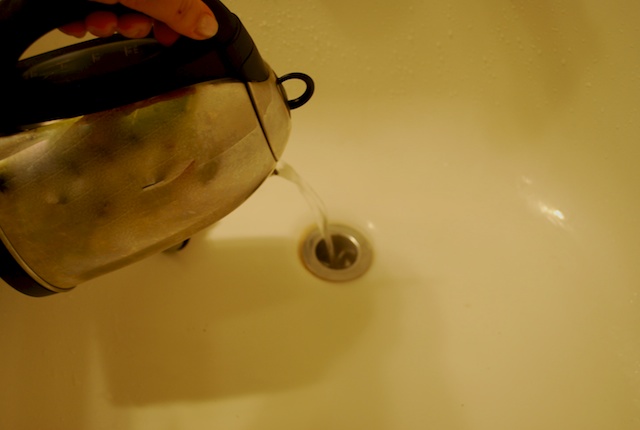
To finish it off, pour the hot water slowly down the drain. This should rinse down the baking soda vinegar mix and any residue they loosened. 

If the problem continues or your drain is clogged and not just slow you may want to call a plumber. I like to do this on a quarterly basis in my most used drains. This keeps them moving and fresh smelling.

Saturday
Jul072012

Jam on it!

When I think about Southern California and what I miss about living there I can't find much. I love Seattle that much! But my best friend Laura is at the top of the very short list and is the only reason I consider ever going back. But aside from that there are a few things I miss. When it is a cold gray day and I need to take pictures of food and really want natural lighting I miss the sunshine almost every day. Now don't get me wrong. I love gray days - just not when I need to do something that needs light. I also miss the strawberries. California strawberries are the best - huge, juicy - sweet. You can stop on almost any corner and pick up a flat for super cheap. Then it is strawberries with everything. 

Here in the Pacific Northwest we have good strawberries. We really excel at other berries - blackberries, raspberries, blueberries. I think these are grey weather berries. Strawberries need lot of sun. But I need strawberries. So throughout the spring I picked up small containers at my local co-op. These managed to tide me over until now. 

I was headed to Sky Nursery the other day and noticed on their website that they have a local berry farm stand in the parking lot. Yeah!! So exciting. When I walked up to the stand I could smell the strawberry goodness in the warmth of the day. So delicious. I picked up 6 pints for $14. Some of the reddest and juiciest berries I have ever seen grown in Washington. 

I had one thing in mind with these beautiful berries. Jam! I have been making jam with my mom since I was a kid. I even made jam with Laura. We made 200+ jars for her wedding favors some years back. It is a kitchen ritual in my home throughout the year at this point. One I truly enjoy. 

I have made jam with regular pectin, low sugar pectin, no pectin etc. I am open to try any method out there. I came across this recipe on the Canning Across America website. I was unsure what to expect since strawberry jam can be hard to get to set up. Let me tell you though, this jam was so easy to make and so delicious and set up so well. 

It has the fresh berry taste plus sweetness and lemon gives the perfect balance. The color is that of ripe fresh strawberries. I scraped a vanilla bean and added that and the pod to the second batch. Pulled the beans out before putting it in the jars. It added a nice mellow vanilla flavor. 

STRAWBERRY JAM
(makes 4-5 8-ounce jars)

4 cups (tightly packed) organic strawberries
1/2 cup lemon juice
4 cups sugar

1. In a stockpot or a canning kettle, cover 5 clean, 8-ounce canning jars with boiling water. Simmer, covered over low heat to sterilize jars. Place lids and rings in another small pan with water to simmer until ready to seal jars.

2. In a clean, dry 4-quart stockpot or canning kettle over high heat, mash berries with lemon juice. (I used a mason jar to mash them - I don't have a potato masher)

3. When the fruit has come to a full, rolling boil, stir in sugar. Continue stirring until mixture returns to a boil, then stop stirring and insert a candy thermometer.  When the thermometer registers 220 degrees, remove jam from the stove and set aside. 

4. With tongs, lift sterilized jars from their simmering water bath and arrange them right side up on a clean kitchen towel.  Transfer jam to sterilized jars, seal according to manufacturers instructions, and then return jam-filled jars to the boiling water and boil for five minutes.  Allow jars to cool undisturbed for several hours or overnight.  Jam keeps for one year.

I think this is the best jam I have ever made. I think that the 1:1 ratio might be the trick. I am going to try it with another type of fruit. 

I enjoyed some jam and toast the next morning! Delish!

Friday
Jul062012

Friday Cookie Day - Ghirardelli Chocolate Chip Cookies

Every Friday here at Immortal Dog is "human cookie day". We always have snacks and cookies in the store for the pups I thought what a great way to treat my customers. It has worked so well that some of my customers have decided to shop on Fridays so they can get a cookie. 

Every week I search for a fun new cookie or opt for a classic. This week I went for the classic - Chocolate Chip. I decided to use the recipe off the back of the package of the Ghirardelli Chocolate Chips. When I am picking up chocolate chips I often ponder which brand to use. Do I buy what is on sale? Do I buy what I like? Do I try something new? I opted for the Ghirardelli Bittersweet and Semi Sweet chips last time. They look so much fancier than Toll House just by the way they are packaged. I have really been in to bittersweet the last few months. They give a more "grown up" taste to the cookie. The Ghiradelli Bittersweet chips are also bigger which I like. 

This recipe came right off the back of the bag. I used 1/2 bittersweet and 1/2 semi sweet. I also added over a cup of toasted chopped hazelnuts. 

Chocolate Chip Cookies

Yield: 4 dozen cookies
  • 1/4 cups unsifted flour
  • 1 teaspoon baking soda
  • 1/2 teaspoon salt
  • 1 cup butter softened
  • 3/4 cup sugar
  • 3/4 cup brown sugar, packed
  • 2 large eggs
  • 2 teaspoons vanilla
  • 1 bag Ghirardelli Chips
  • 1 cup nuts chopped (optional)

Heat oven to 375ºF.

Stir flour with baking soda and salt; set aside.

In large mixing bowl, beat butter with sugar and brown sugar at medium speed until creamy and lightened in color.Add vanilla and eggs, one at a time. Mix on low speed until incorporated.

Gradually blend dry mixture into creamed mixture. Stir in chocolate chips and nuts.

Drop by tablespoon onto ungreased cookie sheets. Bake for 9 to 11 minutes or until golden brown.

I have to say that I really liked these cookies and so did my customers. They have a nice brown butter flavor and remained chewy. They are very rich with the chocolate and the hazelnuts. I do think if you are in the mood to make a chocolate chip cookie these are worth trying and go bittersweet!

Note - I talk about/review products I love. I do not receive compensation for any name brand product I mention. 

Thursday
Jul052012

Happy Birthday Bikini

It seems that summer has finally arrived in Seattle just in time to celebrate the birthday of the bikini. Although two-piece swimsuits had already been around for decades, a Frenchman named Louis Reard officially introduced the bikini on July 5, 1946. His idea was to fashion a garment, using as little fabric as possible, that could still be legally worn in public. 

Louis could not find any regular model who would be willing to model it, so he had to hire a nude dancer.

Emily Post once declared that the bikini is "for perfect figures only, and for the very young." While you won't find me in one or any bathing suit, the bikini is a classic. Here are some from throughout the years. 

Have a great summer!!

Wednesday
Jul042012

Egg Series - Hard Boiled

I have met quite a few lovely 20 somethings that wish they knew how to cook. "I can't even boil and egg" is a common quote. I started thinking about eggs. The perfect complete protein and so versatile. I know that I can use practice on some techniques so thought that a series devoted to egg preparations would be helpful to every cook. 

I have been craving egg salad lately and knew this was the perfect time to get started with hard boiled eggs. These perfect orbs of protein have only 70 calories, come in their own carrying case and can be used in so many recipes. 

Two important tips for great hard boiled eggs.

  • Use eggs that are at least two weeks old. They are best for boiling and will peel easier. Fresh eggs are almost impossible to peel. 
  • Chill in ice water as soon as you pull them out of the hot water. This keeps your eggs from having the icky green ring around the yolk. 

Basic Hard Boiled Eggs

  • Take a bowl and fill it with ice and some water. This will be where you place your eggs after cooking. 
  • Take desired amount of large eggs and place them into a saucepan. Cover the eggs with cold tap water covering them plus an inch. 
  • Bring to a rolling boil over high heat. Reduce heat to a lower medium boil and cook for an additional 10 minutes.
  • Remove from heat and immediately place eggs in you bowl of ice water. Chill for 10 minutes in the ice water. 
  • If you are not using immediately place in refrigerator for up to 1 week in their shells.

You now have perfect hard boiled eggs. You can eat them plain or use them in a variety of ways. One of my favorite things to do with them is make egg salad. 

My mom made egg salad often when I was growing up - on white bread. Some thing to know about my mom is that she does not like mayonaise. The other thing is that she chops all her ingrediants in recipes very small. Both of these come in to play in this classic egg salad. 

Egg Salad

  • 6 hard boiled eggs peeled
  • mayonaise
  • salt and white pepper

Slice eggs and place in a bowl. 

Take a sharp knife and fork and continue to slice them into small pieces. We don't want chunks here. Once you have an even dice of eggs you are ready to mix. 

Season with salt and white pepper to taste. Add a dollop of mayonaise - less is more and you can add if needed. Mix and taste. You should have an egg salad that holds together with a creamy texture but it not drippy or over mayonaised. Pure perfection. 

I like mine on white bread or toast. Today I toasted a baguette and topped it with egg salad for lunch. Yum! Enjoy!