Tuesday
Mar182014

Baby Shower Onesie Art Station

What happens when you invite all your talented friends to your baby shower and give them a chance to decorate baby onesies, t shirts and bibs? 

My friend Kalin planned all the games and activities for the baby shower. Since the shower was co-ed, she didn't want the shower to be silly game centric so she planned this awesome art station. 

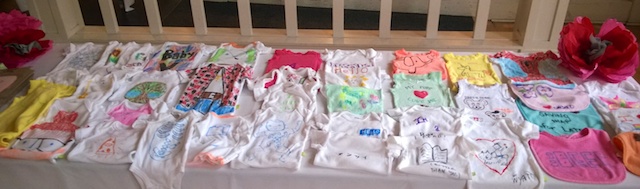
With a guest list of close to 50 it made sense to have a variety of styles and sizes of t shirts and onesies on hand. From newborn, 0-3 months, 3-6 months and 6-12 months also. Also mixed up the styles - short sleeves, long sleeves and summer straps. She also ordered some bibs. This way baby would be able to wear these awesome art pieces throughout her first year. 

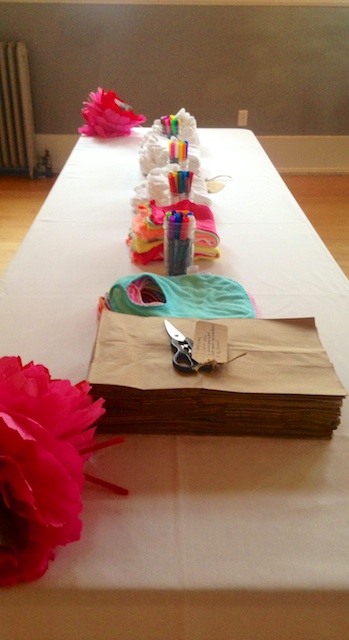
For the decorating she picked up several boxes of Crayola Fabric Markers. Kalin used mason jars to hold the pens. All of the items were washed and dried before the shower. The other concern was the possibility of the pens bleeding through the top layer to the back when decorating them. She solved this by laying out small paper bags and scissors allowing the decorator to place a protective layer inside the onesie or t shirt.

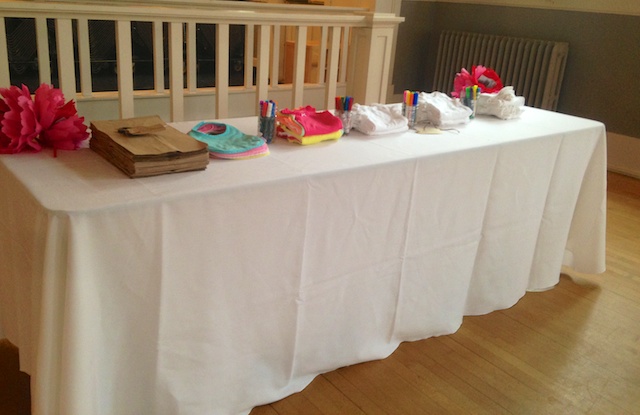
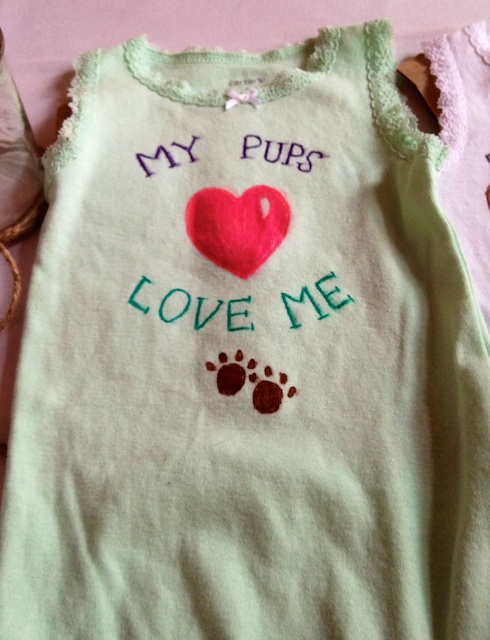
I could not beleive the amazing designs that were put onto these items. It was a big hit with our guests. At one point I looked around and saw everyone head down, quiet and drawing. It was being taken so seriously and fun at the same time. 

The last part of the process for these to be ready for baby to wear is to throw them all in the hottest clothes dryer for about and hour to set the ink.

This was one of the best activities I have ever seen at a baby shower. 

Wednesday
Mar052014

Refinished Baby Armoire

I love the idea of a child sized armoire in little girls room and hanging some of her clothes eventually at her level so she she can choose her outfits. This gives her some independence and that feels great to me. When looking for any type of furniture for a nursery it is very clear that everything is made and designed for the adults. Just about everything we found under the title "armoire" was something I would use in my room. 

I have seen various vintage smaller armoire type pieces over the years on blogs and Pinterest boards but they are few and far between and even rarer in the real world. I started a Pinterest board with ideas and inspiration for what we wanted to find. I was open to converting a dresser to an armoire if we could not find one that was perfect as is. 

We are lucky to have a really great Goodwill in our neighborhood. We stop in often and have found some great deals over the years. We stopped in one Saturday morning and could not believe our eyes when we found this piece in the furniture section.

Wowzers!!!! It was exactly what we were looking for! It was priced at only $29! Other than the hideous paint job it only was missing one of the drawer supports - an easy fix. 

I was so excited to get this project started. First we had to pick out a paint color. We settled on Pantone Pool Green

I grew up in a family that built homes, managed remodels and refinished all sorts of furniture. So it is something I love to do. That said, I don't do this everyday so I want to make sure I have all my ducks in a row so the project turns out the best way possible. 

These are the supplies I gathered for this furniture painting project:

  • Sandpaper - usually 3 grits - rough, medium and ultra smooth
  • Primer - I love Zinsser Bullseye 1-2-3 for all my painting projects
  • Tack cloth to get up all sanding residue
  • High quality paint brush
  • Paint in flat finish - I find it goes on with the least amount of brush strokes
  • Minwax Polyacrylic - I usullay use gloss for furniture
  • Blue tape 
  • Floor covering 

First I took the piece apart. Pulled out the drawers, took off the armoire door and the hardware to clean it of old paint residue. 

The armoire had a very thin coat of paint on it so it only required a small amount of hand sanding to get it smooth and ready for primer. Its important to take your time sanding and prepping your piece as every flaw will show through to the final coat of paint. 

Once my primer had a day to sit and dry very well I followed with 2 coats of the Pool Green paint. I used blue painters tape to tape off areas I did not want to get the gree paint on. Like the back side of the drawer fronts and the inside of the armoire door. 

Once the two coats of paint dry completely I inished the piece with 2 coats of polyacrylic. The reason I use polyacrylic over other types of top coats is because only polyacrylic does not turn yellow over time. I love the gloss on painted furniture and it leaves a nice stong finish for high use pieces. 

Mr. Ramon fixed the drawer support with a leftover piece of wood and we ordered these new white ceramic and gold trimmed knobs from Anthropologie. They made the piece just pop! I was so happy with the final results. It looks terrific in the room.

Tuesday
Mar042014

Reusable Baby Wipes

In our home we try and reduce our consumption of disposable paper goods. This means no paper towels or napkins. Instead we have a stack of cotton towels for cleaning and these great "bistro towels" from Ikea that come in handy for napkins and kitchen use. While there is a cost to washing and drying these items, I feel good that I am not adding to the landfill with more disposable items. 

When thinking about diapers and wipes for upcoming baby I totally understand the convenience factor of the disposable items. For our baby we have decided to go with cloth diapers so it made sense to add in cloth wipes to our plan. Along with the waste that comes with baby wipes there is also the ingredient list to consider. Classic wipes from major brands contain preservatives that can cause rashes on babies skin. They also contain other ingredients such as parabens, fragrance and propylene glycol. They also are subject to a bleaching process that is harsh on the earth. 

There are a few great "natural" disposable wipes if you want to go the disposable route. I really love the wipes from The Honest Co. All safe ingredients and they are compostable. 

When choosing to go with reusable cloth baby wipes you have a couple of options. There are plenty of pre made wipes to choose from and all you have to do is order a few dozen to get yourself started. You can find a variety on baby supply sites like Diaper Junction and even sweet handmade cloth wipes on Etsy. There are a variety of fabric choices all of them soft - flannel, micro fiber, bamboo and cotton are a few. 

I had some lovely flannel with an adorable tiny grey leopard print left over from a baby quilt a made for a friend and I decided to finish my stash by making my own.  I like 8"x8" as a size  and they fit into a conventional wipe container or a container made to hold wipes like this OXO Perfect Pull Wipes Holder folded in half. 

I washed and dried the fabric then cut it into 8" squares. I also made my wipes double sided, using 2 pieces of flannel on each wipe.

 Once I had the 8" squares I used my pinking shears to keep the edges from fraying when I wash them. 

Next I zig zagged them on my machine all the way around to attach both sides together and to help keep them from fraying.

 Now you have a set of soft and beautiful cloth wipes. Look for tomorrows post where we will explore wipe solution options as well as storage and washing. 

Wednesday
Feb192014

Hello Robin!!

As a baker of cookies I was very excited to hear about the new cookie shop Hello Robin that would be opening in Seattle on 19th, a block that is quickly gaining fame with the addition of Linda Derschangs Newest restaurant Tallulaha and the beautifully curated grocery Cone & Steiner. Hello Robin is a beautiful partnership between Robin Wehl Martin and Molly from the well know Molly Moon's Ice Cream

Mr. Ramon and I stopped in one night to check out this spot and get our cookie on. I was blown away by the design of the shop. The use of robins egg blue and white were clean and sophisticated. The space - though small feels full of light and air with the high ceiling and open plan. I was so excited to see a huge work table/bar with chairs around it allowing for classes, demos and getting up close and personal to the cookie making process. I think one of the most beautiful parts of the store is the blue and white tile. 

Now the cookies. I am a bit of a cookie snob and know just what I like. Mr. Ramon chose the Habanero Orange Chocolate and I decided on a classic chocolate chip and a ginger cookie. I really liked the domed shape of the cookies knowing I would find it chewy in the center and just crispy enough around the edges. Honestly I was prepared to be a bit let down as I usually am when buying others cookies - but these were magical in every way. I honestly can't say I have had a better cookie anywhere in the city. 

The customer service was also fantastic. The employee working, Sophie was excited about her wares and we swapped cookie stories. It was so nice to have a freindly face working in this beautiful shop. 

If you are out and about I recommend you stop in at Hello Robin and pick up a couple of these amazing cookies to snack on. 

Friday
Feb142014

Valentines Brownie Hearts

I had quite a few orders for baked sweets come in for Valentines Day. One client lets me decide which type of goodies to bring and I decided to bring them an assorted box of cookies, cupcakes and these adorable frosted brownie hearts. Perfect for the sweetie in your life!! 

The great thing about these is you can use any brownie recipe - even a box variety if you are short on time and ingredients. You want to bake your brownies in a 9x9 pan so they are thinner and you get more hearts. Choose a cookie cutter that is the size you like for your brownie cut outs. I used hearts since its Valentines Day but you could use any shape for any occasion. 

I lined my brownie pan with parchment so when the brownies were fully cooled you could pull them out in ine sheet and easily cut them with the cookie cutter. I save all the leftover brownie pieces for someone in the house to snack on! 

These are fun the way they are but an easy frosting and some toppings make them really special. I made up a quick "buttercream" in a pretty rose color and frosted all of them. Some I added sparkles to and the others I rolled in toasted coconut. Yum!

The possibilities are endless. Pretty much any sprinkle or topping canbe used. Have fun. This is a great thing to do with your children. 

Easy Buttercream Fosting

4 tablespoons cold butter cut into pieces

2 cups powdered sugar

1 tablespoon milk

1 teaspoon vanilla

Place all ingredients into the bowl of your mixer. Blend all ingredients until smooth. 

Should be a nice smooth texture. 

Add food coloring if desired